Digispark подключаем светодиоды ws2812. Программируем в Arduino IDE
Купил Digispark на ATtiny85. Установил поддержку платы в Arduino IDE. Так как по умолчанию Digispark не поддерживает. Подключил к компьютеру и залил пробный скетч. Все работает. С установочным пакетом установилось много примеров в том числе и работа с адресными светодиодами.
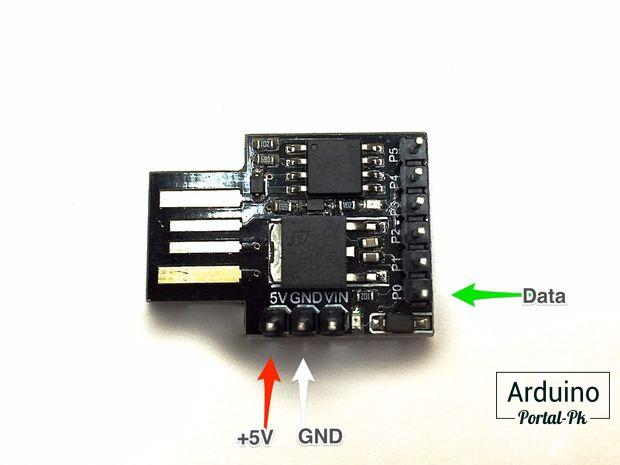
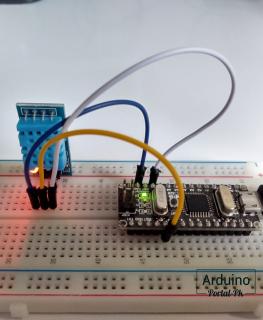
Подключил светодиоды ws2812 по схеме:
Проверил из всех примеров у меня заработок всего один.
// NeoPixel Ring simple sketch (c) 2013 Shae Erisson
// released under the GPLv3 license to match the rest of the AdaFruit NeoPixel library
#include <Adafruit_NeoPixel.h>
// Which pin on the Arduino is connected to the NeoPixels?
#define PIN            0
// How many NeoPixels are attached to the Arduino?
#define NUMPIXELS      1
// When we setup the NeoPixel library, we tell it how many pixels, and which pin to use to send signals.
// Note that for older NeoPixel strips you might need to change the third parameter--see the strandtest
// example for more information on possible values.
Adafruit_NeoPixel pixels = Adafruit_NeoPixel(NUMPIXELS, PIN, NEO_RGB + NEO_KHZ800);
int delayval = 500; // delay for half a second
void setup() {
  pixels.begin(); // This initializes the NeoPixel library.
}
void loop() {
  // For a set of NeoPixels the first NeoPixel is 0, second is 1, all the way up to the count of pixels minus one.
  for(int i=0;i<NUMPIXELS;i++){
    // pixels.Color takes RGB values, from 0,0,0 up to 255,255,255
    pixels.setPixelColor(i, pixels.Color(0,150,0)); // Moderately bright green color.
    pixels.show(); // This sends the updated pixel color to the hardware.
    delay(delayval); // Delay for a period of time (in milliseconds).
  }
}
Библиотеку NeoPixel устанавливать не нужно. Она устанавливается с примерами для Digispark.
Поискал в интернете и нашел неплохой пример мигания светодиодами как на дискотеке
#include <Adafruit_NeoPixel.h>
// set to pin connected to data input of WS8212 (NeoPixel) strip
#define PIN         0
// any pin with analog input (used to initialize random number generator)
#define RNDPIN      2
// number of LEDs (NeoPixels) in your strip
// (please note that you need 3 bytes of RAM available for each pixel)
#define NUMPIXELS   60
// max LED brightness (1 to 255) – start with low values!
// (please note that high brightness requires a LOT of power)
#define BRIGHTNESS  50
// increase to get narrow spots, decrease to get wider spots
#define FOCUS       65
// decrease to speed up, increase to slow down (it's not a delay actually)
#define DELAY       5000
// set to 1 to display FPS rate
#define DEBUG       0
// if true, wrap color wave over the edge (used for circular stripes)
#define WRAP        1
Adafruit_NeoPixel strip = Adafruit_NeoPixel(NUMPIXELS, PIN, NEO_GRB + NEO_KHZ800);
// we have 3 color spots (reg, green, blue) oscillating along the strip with different speeds
float spdr, spdg, spdb;
float offset;
#if DEBUG
// track fps rate
long nextms = 0;
int pfps = 0, fps = 0;
#endif
// the real exponent function is too slow, so I created an approximation (only for x < 0)
float myexp(float x) {
  return (1.0/(1.0-(0.634-1.344*x)*x));
}
void setup() {
  // initialize pseudo-random number generator with some random value
  randomSeed(analogRead(RNDPIN));
  // assign random speed to each spot
  spdr = 1.0 + random(200) / 100.0;
  spdg = 1.0 + random(200) / 100.0;
  spdb = 1.0 + random(200) / 100.0;
  // set random offset so spots start in random locations
  offset = random(10000) / 100.0;
  // initialize LED strip
  strip.begin();
  strip.show();
}
void loop() {
  // use real time to recalculate position of each color spot
  long ms = millis();
  // scale time to float value
  float m = offset + (float)ms/DELAY;
  // add some non-linearity
  m = m - 42.5*cos(m/552.0) - 6.5*cos(m/142.0);
  // recalculate position of each spot (measured on a scale of 0 to 1)
  float posr = 0.15 + 0.55*sin(m*spdr);
  float posg = 0.5 + 0.65*sin(m*spdg);
  float posb = 0.85 + 0.75*sin(m*spdb);
  // now iterate over each pixel and calculate it's color
  for (int i=0; i<NUMPIXELS; i++) {
    // pixel position on a scale from 0.0 to 1.0
    float ppos = (float)i / NUMPIXELS;
    // distance from this pixel to the center of each color spot
    float dr = ppos-posr;
    float dg = ppos-posg;
    float db = ppos-posb;
#if WRAP
    dr = dr - floor(dr + 0.5);
    dg = dg - floor(dg + 0.5);
    db = db - floor(db + 0.5);
#endif
    // set each color component from 0 to max BRIGHTNESS, according to Gaussian distribution
    strip.setPixelColor(i,
      constrain(BRIGHTNESS*myexp(-FOCUS*dr*dr),0,BRIGHTNESS),
      constrain(BRIGHTNESS*myexp(-FOCUS*dg*dg),0,BRIGHTNESS),
      constrain(BRIGHTNESS*myexp(-FOCUS*db*db),0,BRIGHTNESS)
      );
  }
#if DEBUG
  // keep track of FPS rate
  fps++;
  if (ms>nextms) {
    // 1 second passed – reset counter
    nextms = ms + 1000;
    pfps = fps;
    fps = 0;
  }
  // show FPS rate by setting one pixel to white
  strip.setPixelColor(pfps,BRIGHTNESS,BRIGHTNESS,BRIGHTNESS);
#endif
  // send data to LED strip
  strip.show();
}
Также есть неплохой пример с использованием другой библиотеки light_ws2812. Скачиваем библиотеку отсюда.
// Dependency:
//   light_ws2812
//   https://github.com/cpldcpu/light_ws2812
// ---
// if you have USB 3.0 ports, you might need a USB 2.0 hub to program this.
// use the cRGB struct hsv method
#define USE_HSV
#include <WS2812.h>
#define NUM_LEDS 25
#define outputPin 0
#define UPDATES_PER_SECOND 20
WS2812 LED(NUM_LEDS);
cRGB my_crgb;
int h = 0;   //stores 0 to 614
int x = 2;
byte steps = 1; //number of hues we skip in a 360 range per update
byte sat = 255;
byte val = 220;
void setup() {
  // Power up safety delay
  delay(1000);
  LED.setOutput(outputPin);
}
void loop() {
  int inner_h = h;
  for( int i = 0; i < NUM_LEDS; i++ ) {
    if (i%2) {
      inner_h += (i/2)*x;
    }
    if(inner_h >= 360)
    {
        inner_h %= 360;
    }
    my_crgb.SetHSV(inner_h, sat, val);
    LED.set_crgb_at(i, my_crgb);
  }
  h += steps;
  if(h >= 360)
  {
     h %= 360;
  }
  LED.sync();
  delay(1000 / UPDATES_PER_SECOND);
}
Для работы данного примера требуется намного меньше места на Digispark. Поэтому можно дописать функции.
Подписывайтесь на мой канал на Youtube и вступайте в группы в Вконтакте и Facebook.
Спасибо за внимание!
Понравилась статья? Поделитесь ею с друзьями:
Вернуться в раздел: Обзоры Arduino и электроники Дата публикации 10 января , 2018
Читайте также


#6 Гость: Ирина (4 апреля, 2019 в 13:25)
Интересная статья. Плато действительно небольшое, но попробовать можно

#4 Гость: Сёма (26 февраля, 2019 в 12:22)
Статья написано нормально и доходчиво, мне помогло разобраться
#3 Гость: Артур Нахалов (26 февраля, 2019 в 12:22)
Огромное спасибо за статью,очень понравилось, а теперь практика,посмотрим,что получится
#2 Гость: Arturo Pereira (26 февраля, 2019 в 12:22)
Большое спасибо за информацию, я искал проект, который меня возбудил бы, и я думаю, что нашел его.
#1 Гость: Виктория Бьютимейкер (26 февраля, 2019 в 12:21)
ничего себе,сама бы я уж точно не разобралась. Спасибо за такую бесценную информацию
Cлучайные товары
Фреза для пластика оргстекла
Датчик температуры DS18B20 
Мы в соц сетях
Комментарии
Войдите или Зарегистрируйтесь И Вы сможете общаться на форуме и оставлять комментарии без капчи.